

WASHI PAPER BASICS

Awagami washi papers found in this shop are 100% solely made in Tokushima Japan. In order to keep up with international demand our mill makes both handmade and machinemade papers (which is open to the public if you wish to visit). “Tamezuki“ and “Nagashizuki” are the two handmade methods we employ; with Tamezuki being the older of the two methods. Papermaking in the ancient Heien period was described as follows: pulps such as kozo (mulberry), hemp and gampi were cut into small pieces and cooked in a mild alkaline solution. The cooked material was rinsed, cleaned and beaten to break down the fibers. The resulting pulp was then mixed with water and scooped onto a screened frame. Prior to any water drain, the papermaker gently shook the frame or ‘mould’ to even out the pulp distribution. The paper was formed by a single scoop in the vat. Newly formed sheets of paper were stacked on top of each other; separated by cloth to prevent them from sticking together. This method is similar as papermaking in the West.

Early Japanese papermakers astutely noticed that pulp containing gampi fibers had a slower drainage rate allowing the papermakers to repeatedly move the pulp mixture back and forth over the mould’s surface resulting in a stronger paper (with more evenly intertwined fibers). It was subsequently discovered that gampi releases a viscous liquid that actually changes the viscosity of the water resulting in this slower drainage rate. For some time, gampi fibers were added to other fibers to achieve this effect but since gampi is not cultivatable, it was difficult to obtain significant quantities. The key viscous material or “neri” was then extracted from other more readily available plants leading to the development of the “Nagashizuki” style of papermaking which yields the strong, thin and semi-translucent papers that has become synonymous with washi. The Nagashizuki method often uses a wooden mould and deckle unit with a removable flexible bamboo screen. Long-fibered pulp is mixed with natural “Neri” to change the viscosity of the water and suspend the fibers during sheet formation process - resulting in a slow drainage process.

The Nagashizuki method has three basic actions: The first, “Kakengashi” requires a small scoop of the pulp mixture; just enough to only cover the screen surface. The pulp quickly flows across the screens surface with excess pulp tipped out over the far edge of the mould. This quick motion aligns the fibers perpendicular to the splints of the bamboo screen surface and forms the “face” of the paper. This motion makes it easier to eventually remove the newly formed sheet of paper from the screen. 2nd is “Choshi” when a larger scoop of pulp flows back and forth evenly coating the entire screen. It’s important that some pulp mixture remain in the mould to help counter the pressure of the pulp mixture from the backside of the screen when the next scoop is taken. This action is repeated several times until the desired paper thickness is achieved. The thickness is built up layer-by-layer enabling the long fibers to become well entwined. The 3rd action, “Sutemizu” is a bit similar to the first as the pulp mixture is quickly flowed over the entire surface with the excess tossed off the far end of the mould. The quick motion aligns the fibers in a single direction and forms the back of the paper. The manufacture of strong and semi-translucent sheets of paper is possible using the Nagashizuki method but this method also can lend itself to a variety of paper thicknesses and characteristics.


Harvesting the Fiber
Awagami's kozo fiber grows on the mountainside adjacent to the mill and is typically harvested during winter (December to February) after the leaves drop and only bare stalks remain. The stalks are cut to 1.2m lengths and placed in special barrel-shaped steamers. The steaming process or ‘SEIROMUSHI’ makes the removal of the bark in one continuous strip easier. This stripping is done in a single action, beginning from the stalks bottom. The stripped bark, referred to as ‘KUROKAWA’ is then hung in bunches to thoroughly dry until needed.

Preparing the Fiber
The dried strips of Kurokawa are soaked overnight to soften the tissues and make the removal of the outer layers easier. The soaked bark is carefully stepped upon and rubbed between the feet in running water to remove the loosened dark outer bark. If the dark outer bark is to be used in the making of specialty papers, this removal process is done under more controlled conditions so that the pieces of dark bark can be collected and dried separately.
Once the dark outer layer is removed, the ‘Aohada’ green layer (which contains more hemicellulose than pure white layer) is carefully scraped away with a knife. The scrapings are collected and used in the making of other papers. During this step, any discolored or damaged areas ie.: bud or branch scars are also removed. The amount of this Aohada removed determines the natural whiteness of the final paper. The cleaned “SHIROKAWA” or white bark is dried in a cool shaded area until ready for further processing.
If the Shirokawa becomes dry, it may be soaked overnight before cooking. This will rehydrate the dry bark and help remove any water-soluble elements (starches, tannin, proteins, etc.) as well as make it easier for the alkaline solution to penetrate the fibers. The bark is again rinsed to remove any impurities before cooking. The prepared bark is then cooked in an alkaline solution such as wood ash (or potash), caustic soda or soda ash. The amount of alkali used is about 15% - 20% of the dry weight of the fiber to be cooked. This is added to water; the amount of which is equal to at least l0 times the weight of the dry fiber. The fiber is added to this alkaline solution and this is brought to a boil then allowed to simmer for at least two hours. The bulk of the material decreases as the fibers soften and the liquid turns a dark brown with the non-cellulose materials dissolving during cooking. The fibers are stirred occasionally to insure an even cook.
The characteristic feel of washi is determined by the amount of non-cellulose materials contained in the fibers. When a strong alkali is used, more of the non-cellulose materials are dissolved thus resulting in a softer paper. If more non-cellulose materials remain in the fiber, then the paper has more body. The type of alkali used also affects the color and feel of the fiber; so it is necessary to match the alkali used with the kind of paper to be made. The fiber is tested after about two hours when a thick piece is carefully removed and rinsed to cool. If it can be gently spread apart to reveal a fine network of fibers or if it can be pulled apart widthwise easily, then it has been sufficiently cooked and is left to cool overnight in the solution.

The following day, the cooked bark is removed and thoroughly rinsed in running water until there are no traces of the dark alkaline solution. The cooked fiber is kept moist and cool to prevent it from spoiling. Once the cooked fibers have been rinsed, it must not dry out because the non-cellulose materials will then have a chance to re-harden. If this happens it is too difficult for the fiber to absorb water so the fibers must be recooked again before processing can continue.
If white paper is to be made, the fibers are bleached at this stage. Traditionally, natural bleaching methods involving running water, sunlight and snow were used. Nowadays various eco-friendly bleaching agents can also be used. Afterwards, fibers are again thoroughly rinsed and placed in a strainer (floating in water) for further careful cleaning. Any scar tissue, buds, discolored areas etc… are carefully removed. Since the lignin and pectin that normally hold the fibers together have been removed, great care must be taken to keep the strip of cooked fiber in one piece to prevent the loss of precious fibers.
The cleaned strips of damp fiber are now ready for beating on a wooden or stone surface. The separate strips are beaten until they become a mass of separated fibers. Today, beating is also done using an automated ‘NAGINATA’ beaters. The beating process separates and roughens the surface of the fibers; it is not meant to cut or shorten the fibers. To test if the fibers are sufficiently beaten, a small amount of fiber is placed in water and stirred. If the fibers disperse evenly with no long thick fiber bundles floating, then the fiber has been sufficiently beaten.
Basic Papermaking Tools
The fundamental tools required to create Japanese and Western papers are basically the same. The vat or ‘SUKIBUNE’ is traditionally made from pine or cypress with contemporary versions lined in stainless steel. The primary function of the sukibune is to hold the fiber-neri-water mixture but it has several attachments making it different from a Western vat. On the left / right side are two notched posts or ‘TORII’ supporting the ‘UMAGUWA’ (a large comb-like tool) used to mix the fibers in the vat. Inside the sukibune are two narrow boards or ‘OTTORI’ used to rest or support the ‘KETA’ (papermaking mould) when opening it to remove/insert the ‘SU’ (flexible screen). The major difference between Japanese and Western moulds is Western moulds have a removable deckle with an attached rigid screen while Japanese mould and deckles are actually hinged together with a flexible/removable screen.


Basic Papermaking Process
The beaten fiber is added to water in the sukibune. Usually the amount of fiber is equal to about 1% of the amount of water and mixed thoroughly so as to evenly disperse the fibers. Neri solution is then added (the amount depends on the type of paper to be made). If too little neri is added, the water drains too quickly for the pulp mixture to be flowed repeatedly over the screen surface; too much and it drains too slowly resulting in paper that is difficult to remove from the screen.
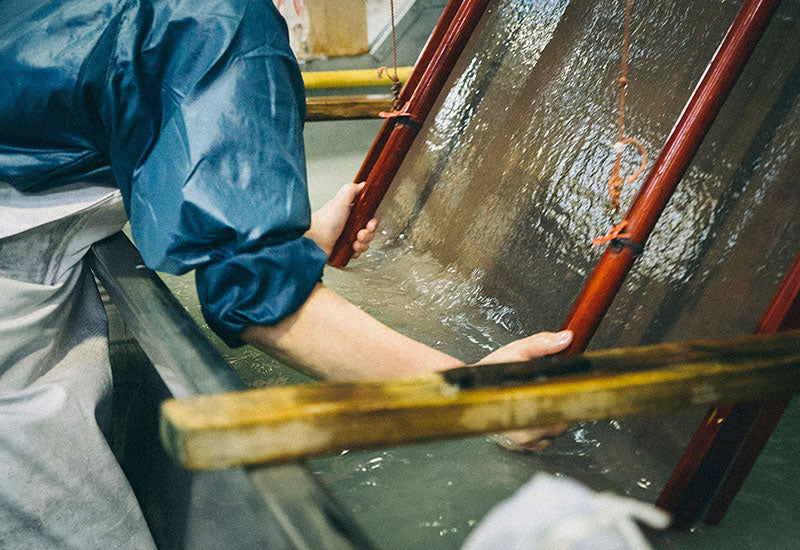
The Nagashizuki method requires the fiber mixture to be in constant motion over the surface of the screen. As discussed earlier, he sheet of paper is formed by three basic actions: KAKENAGASHI, CHOSHI and SUTEMIZU. The actual motion involved varies according to the kind of fiber used, paper to be made and the individual papermaker. It’s said that on the average a single sheet of paper takes one minute to complete; resulting in 40 sheets per hour (allowing additional time to add pulp and neri to the vat) or about 300 sheets per day. Once the three basic actions are mastered, improvement comes with the elimination of all unnecessary or wasted movements.


The screen and the completed sheet of paper are removed from the keta and in a smooth overhead motion from mould to the ‘SHITODAI’ or couching stand. The shitodai is placed directly behind the papermaker and has a flat surface unlike the curved surface of Western style stands. The flexible screen is aligned with the guides or ‘JOGI’ attached to the stand, to insure an accurate placement of the new sheet directly on top of the previous sheet. The edge closest to the papermaker is laid down and the flexible screen is kept at a 90°angle as it is carefully lowered to prevent trapping air between the sheets. When the entire screen with new sheet is laid on the post, the screen may be lifted starting from the edge nearest the papermaker. It’s carefully peeled off away from the papermaker and replaced in the mould with the opposite side of the screen now facing up. This technique insures even use of both sides of the screen and prevents the build up of any fiber residue on the surface that may interfere with future paper removal. If the papermaker will not immediately make another sheet of paper, the screen is left on top of the papers on the post to prevent the surface of the top sheet from drying out.

The post of newly made papers is lightly weighted and allowed to drain naturally overnight. The next day, it is put into the ‘ASAKUKI’ or press and gradually pressed until 30% of the moisture is removed. Traditionally a counter-weighted press was used in Japan but nowadays a hydraulic version is commonly used. The pressed papers are carefully removed one-by-one and brushed onto boards to dry naturally or onto a steam heated metal surface for quicker drying. The drying method, be it natural or mechanical, significantly affects the finished paper, so the drying is always matched with the particular type of paper being made. In the old days, the finished papers were then cut by hand into specific sizes and also to remove the deckled edges. Nowadays the deckled edges are maintained as an indication of its handmaking.

